
This is Part 2 of our Garden Revamp project, part 1 can be found here, which I’ve forgotten to include the original design done by Haze on Sketch Up, it is now included in this post.

Garden Revamp Plan
We followed the design quite accurately, with the only difference being omission of the climber fence on the right bottom corner. We ended up planting kantan flower, lengkuas, and lemongrass on that particular plot, which does not warrant a climber fence.

building the water planter, aggregates, sand, cement
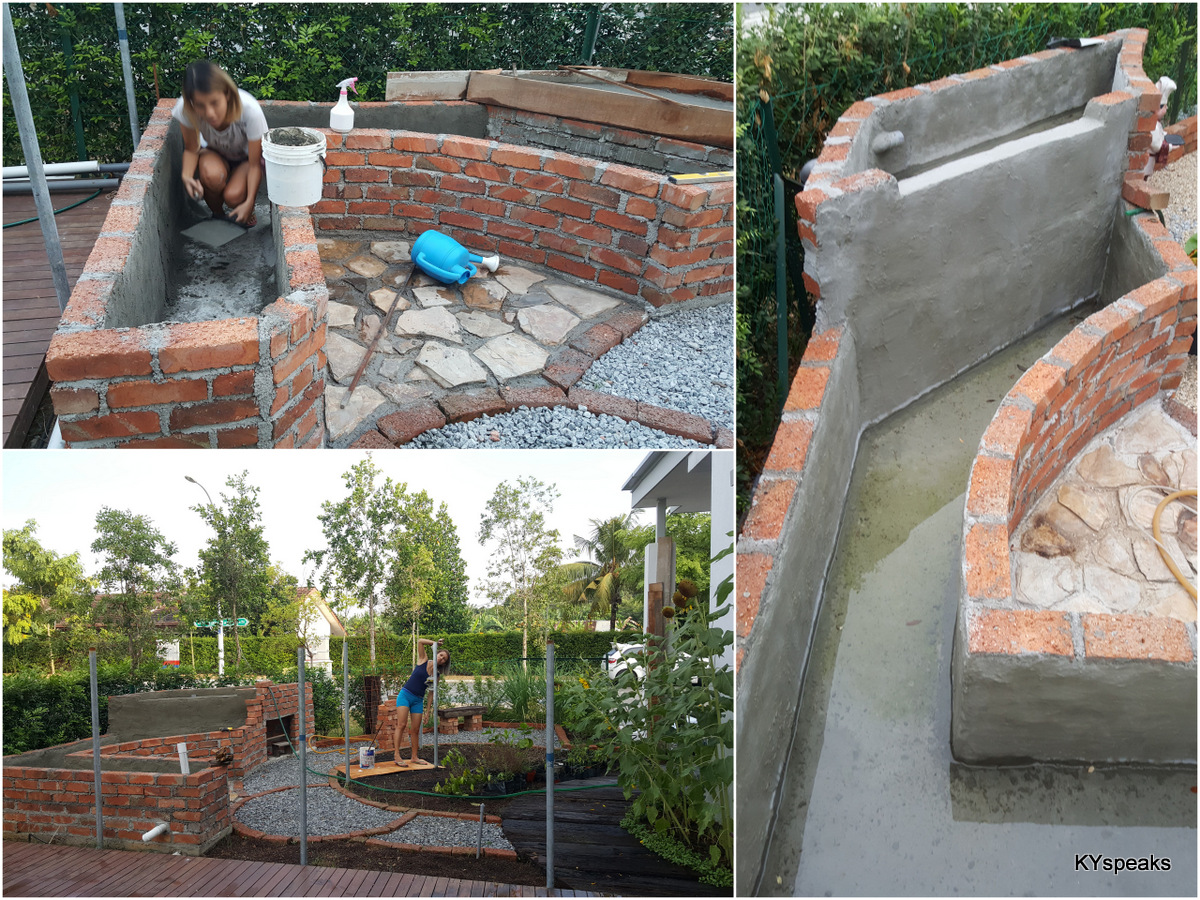
By far, the most difficult part of the project involved building the water planter, which serves three purposes:
- filtration system for the koi pond
- planter for water plants such as lily, lotus, kangkung etc.
- pond for edible fish (tilapia, soon hock)
We made some rough measurements on the red bricks, aggregate, cement, sand, wood, and BRC needed for the planter and went to the nearby hardware store to get the goods.

the second layer is a bit trickier
Concrete work started on the 8/5/2016 in the evening. It turned out to be quite an unfortunate timing as you must complete concrete pouring in one go, it started raining heavily half way through and gotten dark, we ended up working till past 10pm to get it done. Thankfully that was possible partly due to the lights we had bought for Mount Kinabalu hiking trip.
After the foundation is done, we built up the perimeter with red bricks and cement (1 part cement, 3 part sand mix). We’ve also added some pipings for water inlet (1.5″) & outlets (2 x 2″).
waterproofing turns out to be quite a challenge, we used Sika
To make the upper level of the planter, I laid out bricks to support the wooden mould and did the same concrete pour. Then it was another round of red bricks and cement.
The inside of the pond was done plastered with cement and then painted over with Sika waterproofing agent. Waterproofing took quite a number of iteration as our plastering job was quite corse and uneven, thanks to the lack of experience. Oh well.
Building the water planter took a month, but water proofing was another couple months since we took some time off in between.

holes for posts in preparation for climber plots
While building the water planter, we also built some fencing for climbers.
The poles were actually 1″ water pipes sourced from local hardware store. We dug 1 feet deep holes and cemented the poles in with concrete. They turned out to be quite sturdy.

we procured galvanized fencing and repainted them black
We then affixed galvanized fencing (with anti climb fence fixtures) by drilling some holes on the poles. The lesson learned here was on drill bits, always buy quality bits, I ended up spending so much effort drilling a couple holes with cheap bits while the more expensive Bosch bits did the job with ease.
We then painted the whole thing black to suit our color theme.
At this point the garden is some 80% done, awaiting piping & planting. Will update part 3 with a rough total material cost soon.
Wow! Is that the garden for your house? Impressive!
Dead Cockroach: yes, thanks 😀
No ‘pondok’ for the garden? But the landscape looks very nice with the water planter. Waiting for part 3..hehe..
BukuTravel: not enough space!
the “pondok” is the house hehehehehehehhee
immature: Hahahha
KY, how wonderful your garden project. What kind of plants you going to have in it? Back in Hawaii my home is locate on the mountain side and every morning there morning rain so there there no need to water plants because of it.
Vickie: We have quite a few herbs, and there’s also okra, and we had long beans before too. Still to come are pumpkins & more!
I love gardens! I think it’s what I miss most from my childhood now that I live in the city.
The Yum List: vertical garden’s all the rave now!
The neighbours wonder what u doin past 10pm building underground nuclear bunker or something, then trump became prezident ahhhh all make sense now….
immature: shhhh, don’t expose me!
Wow! Besarnya garden KY! Kat mana rumah KY? Rumah I takde garden sebab duduk kondo. Can’t afford to buy landed. Maybe I should become a food blogger. Baru mampu beli rumah atas tanah 😛
Bah: Haha, food blogging wasn’t the reason we got to buy this house. 😛
It’s going to look really nice. Throwing a party once it’s done? Invite me, ya! 😀
suituapui: it’s almosttttt done, come! haha.
next time come tolong do my frontyard also. kkeek
taufulou: ok wait ya. haha.